
Getting out of the house with all the necessities can be a challenge, especially if you’re on a bike. But not anymore! Say hello to bike frame bags: you’re new essential for turning your ride into a portable command center.
Installing a frame bag is easier than you think, but it still requires some preparation and a few tools. To help you on your way, we’ve put together this step-by-step guide to help you get that bag on faster and without issue. With our tips, you’ll be zipping around town in style and efficiency before you know it!
What Is a Bike Frame Bag?
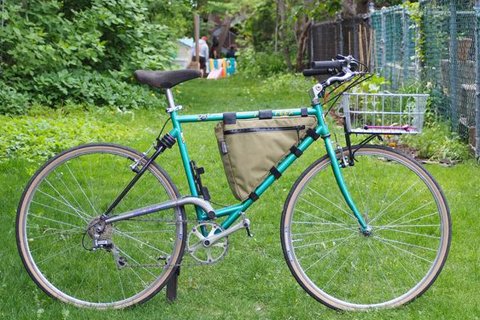
If you’re a cycling enthusiast, chances are you’ve heard of or seen a bike frame bag. But what is it? A bike frame bag is a type of saddlebag designed to mount directly to the bicycle frame, typically either beneath the top tube or above the down tube. These bags provide convenient storage for cycling essentials such as snacks, tools, and spares—without interfering with pedaling motion or balance.
Frame bags come in different sizes and shapes to fit different bike frames, so they can accommodate any budget and riding style. Generally speaking, they are lightweight, water-resistant, and secure enough to carry heavier items without worrying about shifting cargo. With all this in mind, it’s no wonder why so many cyclists opt for a bike frame bag on their next ride!
Why Use a Bike Frame Bag?
You’ve heard about bike frame bags and you’re wondering why you should install one.
Well, one of the many great things about having a frame bag installed is the convenience it brings to your biking experience. With your supplies easily accessible in a frame bag, rather than tucked away in a saddlebag or other hard-to-reach area, you have everything at your fingertips.
In addition to the convenience it provides, bike frame bags offer plenty of space for carrying biking necessities like snacks and water bottles. Plus, they’re lightweight and easy to pack with virtually anything you need – making them perfect for long or short rides alike.
Finally, bike frame bags help keep your supplies steady during rides so nothing falls out or shifts while you pedal. This helps ensure that your belongings stay secure no matter how tough the terrain gets.
Whether you’re an avid cyclist or a first-timer, the advantages of having a bike frame bag are invaluable – so don’t miss out on this must-have accessory!
How to Choose the Right Bike Frame Bag
One of the most important steps in installing a bike frame bag is actually choosing the right bag for you. There are lots of different kinds, so think about your needs before you start shopping.
Size
Do you need a small frame bag for just the essentials or something bigger to fit your laptop, camera, and other goodies? Measure your top tube and frame triangle to get an idea of what size you need.
Materials
This choice also depends on how much waterproofing you need—some materials are water-resistant while others are fully sealed. Consider the kinds of rides you take and the kind of items you plan to put in there before committing to one material over another.
Additional features
Do you need straps and clips that let you secure your bag, or a pocket with zip closure? Do you want reflective details, an external mount for a light or an adjustable strap divider? Think about these details when shopping for the right bike frame bag.
How to Install the Bike Frame Bag
Okay, so now that you’ve chosen the right frame bag and gathered all the necessary tools, let’s get down to business. Here are the steps to install your bike frame bag:
Step 1: Locate mounting points
If your frame has pre-drilled holes and eyelets, then you’re in luck—this will make it much smoother for installation. If not, use self-tapping screws to drill holes. Just be careful not to puncture anything near the water bottle cage or internally-routed cables!
Step 2: Install M-Brackets
Attach your M-Brackets to the mounting points inside the frame using screws. These will act as an anchor for your bike frame bag.
Step 3: Attach Straps
Now comes the actual installation of the bag itself—take it out of its packaging and attach it to your M-Brackets with straps. Make sure these straps are tight enough so that they won’t come loose while you’re biking (but don’t overdo it either!).
Step 4: Finish off with zip ties
To further secure your bike frame bag, use zip ties and secure them firmly around the eyelets or holes. Once that’s done, you may need to adjust a few other elements on your bike before taking it out for a long ride.
Tips for Using and Maintaining a Frame Bag
You’ve purchased your bike frame bag and now you need to know how to use it and maintain it. No worries, here are some tips to help!
Secure the Bag
The first step is to secure the bag into place. You want it tight enough so that it won’t move around or bounce during a ride, but also not so tight that you can’t access the zipper with ease. Depending on the type of bike frame bag you have, you may need straps or clips to secure it.
Accessibility
If your bike frame bag has a side zipper, make sure you choose a side that is easy for you to access while riding. You don’t want something that’s on the other side and too difficult to reach while keeping your eyes on the road.
Maintenance
Bike frame bags are built tough, but they still need a bit of maintenance from time to time. Make sure to wipe off any dirt or debris after a ride and store it in a dry location if not used for an extended period of time. Also, check for signs of wear or tears in the material and repair if needed using fabric glue or patches.
FAQs on Bike Frame Bags
Installing a bike frame bag shouldn’t take long—it’s easy, and fast and you should be done in no time! Here are a few frequently asked questions to keep in mind when you’re getting ready to get started:
Can any bike accommodate a frame bag?
Almost all bikes can accommodate a frame bag. The exceptions are usually ultra-small frames that don’t have enough room to securely fit the bag. For these, you can find mini bike bags, which are smaller and sleeker than full-size ones.
Is the installation difficult?
Not at all, installing the bike frame bag is relatively easy and straightforward. You just need some basic tools (Allen wrench, screwdriver, tape measure, etc.) and follow the instructions that come with your frame bag or go over our step-by-step guide!
What if I need help?
If you ever find yourself stuck or in need of assistance, just reach out to us — we’ll be glad to help you get your frame bag installed correctly.
Conclusion
Installing a bike frame bag is a great way to pack a few items on your next ride. The process is quite simple and should only take you a few minutes. All you need is a few tools and a little patience.
The biggest thing to remember is to test the fit and make sure the bag is secure before going on your ride. Once you have securely installed the bike frame bag, you’ll be able to easily store your gear and be ready to hit the trail. So, grab your tools and get to installing—happy riding!